Ham Radio - Camera -
Computer - F8HP - UV5R - Baofeng - Pofung
Product Review
 UV- 50X2
Version 2
50W Dual Band Mobile
136-174MHz / 400-520MHz
68-108MHz (FM Broadcast)
by: John 'Miklor'
March 2017
Rev. Dec 2022

50W Dual-Band Mobile

Product Review
Version 2
50W Dual Band Mobile
136-174MHz / 400-520MHz
68-108MHz (FM Broadcast)
by: John 'Miklor'
March 2017
Rev. Dec 2022

50W Dual-Band Mobile
|
General Description
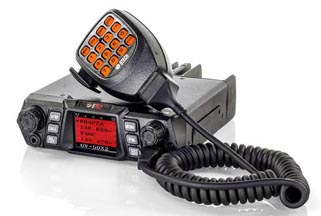
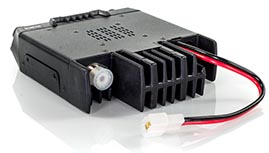
I must admit that after a while, all mobile radios start looking the same. Finally, the new BTech series has broken that tradition with not only a new case and screen design, but several options not found in other similar appearing radios. Described below is a description of the additional features that have been added to this design. There are actually 3 radios in the 'X-series', but this review will focus on the high power version, the 50W UV-50X2. Version 2 Additions * -- Upgraded with the addition of an Audio I/O cable via the RJ45 Microphone port. This includes a K1 adapter for compatibility with a wide range of accessories, including APRS cables, TRRS 3.5MM adapter, etc. -- The version 2 now includes VOX for hands free mobile operation. -- Improved internal audio filtering to improve suppression of mobile 'picket fencing'. In the Box Included with the radio are: - Microphone with a 16 button keypad - RJ-45 Accessory Adapter (v2) - Chrome metal microphone hanger - Metal mounting bracket with screws - Heavy Duty DC Power Cable (HD Auto Fuses) - Full 69 page English User Manual 50X2 Weights in at a hefty 42 oz (1.2 kg) Chassis Size is 5.7" (W) x 1.9" (H) x 7.5 (D)" (145 x 47 x 190 mm) Specifications The 50X2 is a full 50W+ 200 channel transceiver that supports several new options. This includes functions such as display synchronization, microphone gain control, the ability to alter channels on the fly without the need for software, frequency randomization, and a few others. A full specifications can be found HERE Enclosure and Mount The main chassis weighs in at a solid 2.6lb with a top finned heat sink and cooling fan in the rear. The radio is terminated with a standard SO-239 connector with heavy duty dual fusing.
Transmitter I used my 13.8VDC power supply to emulate a standard auto battery. Although the high power rating is conservatively rated at 50W on high power, running the radio into a calibrated Bird Wattmeter for 2 minutes showed no decrease in power at a respectable 62W.
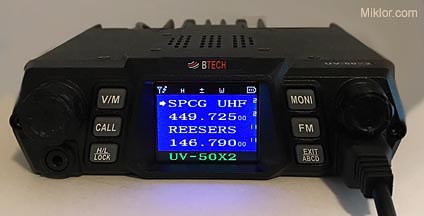
Microphone & DTMF Gain Controlling One of the newly added features not found in similar appearing models is a microphone gain control. It allows me to advance the gain for operation at home so I can back off the microphone a bit, and reduce the gain when mobile to avoid picking up road and background noise. Be careful when setting the level. Only move the level up a few points at a time. I found setting the audio level too high was, well, way too high. Audio reports and quality were excellent. Along with the microphone gain, there is also an option to vary the DTMF gain. I found this extremely helpful for accessing IRLP networks. Receiver / On Screen Scanning The 50X2 has both a Wide and Narrow receiver, depending on the mode selected with a 2W audio section that provides plenty of volume. The UV-50X2 as well as the entire X series has the ability to display four frequencies on its new display. The TMR option (Transceiver Multi-Receive) allows any 2, 3, or 4 displayed channels to be selected for 'on screen' scanning. If a selected channel becomes active, the display will lock onto that channel and remain there for a predetermined amount of time before resuming the scan. This is a great option when traveling to a new area and not knowing which repeaters are the most active. The scan rate is 3 to 4 channels per second. Fast enough to go through the four channels and not miss a call. Channel Scanning Normal channel scanning is still available with a little added bonus. I can now add or delete a channel from the scan group on the fly. This eliminates my need to reprogram using software to make minor change. Another option I found was the ability to set the scan mode to start or resume immediately upon power up. This saves a few steps if you like to keep your radio in the scan mode. Display / Display Syncing The new face design includes a much improved OLED* display (1 3/8 x 1 1/8") with nine color choices that can be configured in any combination of your choice. The available colors are Black, White, Red, Blue, Green, Yellow, Indigo, Purple, and Gray, giving virtually thousands of color combination possibilities. I found the resolution of the new OLED display outstanding. Regardless of the color, the display is bright and extremely clear. No more squinting. My iPhone didn't capture the display image as well as I had hoped, but this will give a rough idea of some various color combinations. * Organic Light-emitting Diode
Now, this is the part I like best. The X series has display synchronization. I can select display pairs. (A/B, C/D, or A/B C/D) and pair them together. When changing channel, the selected pair tracks together, displaying both the repeater name and frequency. That gives me the best of both readouts. The screen clarity is amazing.
Programming One new capability I found extremely helpful was the ability to change channel parameters such as tones, power, and scan add via the keypad, without the need for deleting and reentering the channel data. The programming software for this radio is CHIRP. The advantage here is CHIRP's compatibility with over 160 different models of radio, so if you currently have a transceiver programmed with CHIRP, all that is needed is to create a template of the new radio, and a simple cut and paste of your channel list. If you are new to CHIRP software, there are guides and examples available HERE. Channel Randomization Here's a unique special purpose option. It allows what is known as frequency hopping and requires two X series radios. The four channels in the display can be set to four different simplex channels. The same channels must be set in the same sequence in both radios. Each press of the PTT moves the radio to the next channel. A, B, C, D, A, B, etc. As long as you identify the first time you use each channel and again every 10 minutes, you should be fine. It's a bit tricky to set up, but it works. Mobile Power Cable All power cables are not created equal. If your radio has a maximum output of 25W, it will require approximately 5-6A from your battery or power supply. This is well within the range of the average cars accessory socket which is normally fused at 10A. If you are using a radio that runs 50W, such as the 50X2, it is going to draw between 10-13A, requiring a connection directly to the battery or fuse block. Base Station Operation When choosing a power supply for base station operation, a 50W (11-12A) requires a power source capable of 15-20A continuous (not just surge) for proper operation. A 25W (5-6A) will require a power source of at least 8-10A continuous. An insufficient power supply put strain on both the supply and radio resulting in damage or equipment failure. Here are a few power supply Examples that may assist. Manual A small error was detected in the manual. Page 13 shows the shows the Data port on the rear of the radio. The Data port is actually on the Front of the radio and is a TRRS jack. The External Speaker jack is on the Back of the radio and is a standard 2 pin TS external speaker jack. In Summary It looks like BTech took a great design and took it to the next level. It is based on a proven design, and I have found no issues with the radio while testing. The newly added features found in the X series includes: - Memory modifications on the fly - Display synchronization - Adjustable microphone gain - Adjustable DTMF gain - Frequency randomization - Scan resume options - Quad Watch display - Scanning start / return on Power On BTech had its act together when they designed the firmware for the X series. Note: This equipment was received for the purpose of a fair and unbiased review. All findings are factual based on the equipment I received. Any issues found have been reported both here and back to the seller or manufacturer.
|
 UV-50X2 50W Dual Band -Review-  UV-25X4 25W Tri Band -Review-  UV-25X2 25W Dual Band -Review- ^ PC04 ^ Programming Cable (for above)  UV-50X3 Tri-Band -Review- ^ PC05 ^ Programming Cable (for above) |


